Discovering the huge potential for improving the efficiency & quality of lighting that Light Emitting Diodes (LED's) offer right now! at least on a par with HQI, providing in excess of 100 lumens per watt of power input!

Sunday 26 August 2007

Supplementary charging System used on camping trip

Yeovil


All camp lighting was LED, for me bulbs are obsolete with the exception of car headlights & a few others, my main (tiny) "flashlight" shown below is powered by 1 x 3.7v 123a rechargeable, drives a Seoul P4 Zled at 700ma via a tiny control board shown above & will full power for approx one hour, the output is massive for such a small light.


Solar panel with diode in series to charge batteries plus bike batteries connected to chopped off charger leads all in parrallel soldered together under lump of epoxy glue.


Brought out leads from the feed in terminals on the charging system of battery banks so that at least 5+v would be available for battery charging, plus made up supplementary 5v pack of nimh AA cells + all purpose phone/satnav/batt pack/solar charger lead assembly to enable various permutations of useage.


It worked well on a 10 day ride to Penzance enabling sat nav on phone which sucks life out of the Nokia N70's battery fast, plus in tent charging via extra 5v batt pack, wiring a bit rudimentary on bike but functioned well, the hub dyno was great & little resistance noticed.


Used the lights on bad vis days plus helmet rear red light, & was lot of lighting for 100ma of batt drain on get home mode, well within dyno capability.


Available-components-at reasonable cost


Tuesday 17 July 2007

Obtaining gear LEDS etc.

Yeovil


http://search.ebay.co.uk/_W0QQfgtpZ1QQfrppZ25QQsassZkinkanewt

Usefull source of LED's

Friday 11 May 2007

Pictorial Progression 2

Yeovil


FATMAN
Anything but fat superb up converting constant current regulator from TaskLED.
Housed in the topmost box (considering heatsinking it as a precaution) very efficient 90%


Above two pics .. lets hear it for the genny!!!


Rear all lit up .. runs from key sw on position direct from batts


Charging switches bottom, left is generator connect disconnect, right is battery bank charge select.


Key switch (required prevent battery run down by idiots) bit big but free & available


Left sw = open circuit for second sw control


& shorted for minimum current. 70ma


Right sw (three position) top resistor switched in 400ma approx, mid (open circuit) 1000ma, bottom resistor switched in approx 700ma.


Leaving left sw on v/low 70ma & right sw on centre 1000 ma means a very quick flick of left sw required for hi burst to warn motorists to "dip".


Original light "beefed"


CPU Heatsink (50p) cut out pan (50p) bracket from scrap box, rivets screws nuts washers in hand.


Top side view of light pod, front yet to be sealed .


70ma output under bright lighting


Ok full blast not looking directly into optics 4 seoul lights kicking out 15w of LED lighting under very bight fluorescent lighting!


4 x 240 lumens? (rating at 1000ma)


Complete system side view, in touring mode. (see room needs decorating hmmmm)


Pictorial Progression 1

Yeovil


Looking at centre of B&M Light see optic 5 x 25 degree inserted & heatsink lost in cored out rear
Heatsink on inside of pan

Top two are plain 15 & 25 degree spots


Bottom is oval 5 by 25 degree


Some trimming of the copper pads was done & a start had been made but not completed in above pic.


Screws were reduced in head dia. file & electric drill lathe (ha!)


Waste pipe (sinks etc) uncut screw end in white with thin clear acrylic as shield glued in.

Three ally lugs made to suit from .. yes you guessed frying pan.


Mounted three led stars on pan before cutting out.


Completion of Lighting

Yeovil


I planned on using three LEDs as my total loading, but my battery configuration giving 10 volts output meant that my boost converter would go into direct drive when I reduced the power output if I only used three! Even though it turned it down to 350 milliamps I required even further reduction to enable me to have an emergency lighting situation, for example if I chose to cycle through the night even though my 3 W Hub dynamo would be boosting the batteries one bank at a time switchable.So I decided to bring four lights into the equation, with a small amount of testing this proved to be the answer to my battery configuration, using the trim pot I could then drop the output to about 70 milliamps which by the way was still brighter than the original lighting system.The forward voltage from memory as I believe 2.7 volts minimum, so for approximation four times 2.7 equals 10.8 volts... 10.8 volts at 70 milliamps equals about threequarters of a Watt total for the four LEDs at a minimum power level, fully sustainable as the Hub dynamo is rated at 3 WFurther testing produced:-With 4 x Seoul p4 in series using 8 AA NIMH IN SERIES led current 0.710 amps led total volt drop 13.22 = 9.3862 wattsbatt current 1.15 amps at 9.2 volts = 10.4926 wattsefficiency = 89.455 led current 0.350 amps led total volt drop 12.53 = 4.3855 wattsbatt current 0.49 amps at 9.82 volts = 4.81 wattsefficiency = 91.18Set up with two switches four power levels shorted lowest open circuit highestplus two resistors for intermediate power, four seoul p4's flashed up on high from low quite impressive!!Well pleased with the Fatman thanks George.

Progress & experimentation

Yeovil


On searching further through the forums, I chanced upon someone who had really built a nice system using three LEDs in series all controlled by a board made by http://www.taskled.com I made further investigations, and found they made a board which would appear to suit my purposes, I needed to power up three LEDs at least. below is the lead to TaskLED

bryfos:I would say my system would charge a 7.2v battery no problem... giving 500ma + most of the time...but if running the LEDs from a battery, I would use a Constant current driver...these are what I use now...http://www.taskled.com/these are pretty much the best drivers around...I use the bflex for most things, including my bike lights...great work guys...No more from me, please email me for any more info...don't want to hyjack gone fishing's thread...bestKtronik

This next forum insertion of mine, will explain more about what I did next, which included modifying the original bicycle light which came with the dynamo Hub.

This is an update on my progress so far, regards my bicycle lights using Seoul p4 "u bin" stars.
I originally planned to use a variable voltage regulator to control the throughput of the LEDs, this indeed I tried but a certain fact was pointed out to me, which was that the LEDs would gradually creep up in current even though the voltage was stable; this became evident and although no LEDs were damaged I had to rethink the idea.
Through the forum's The TaskLed site featured for current limiting devices, and George of task led was very helpful, I eventually chose a boost converter named "Fatman
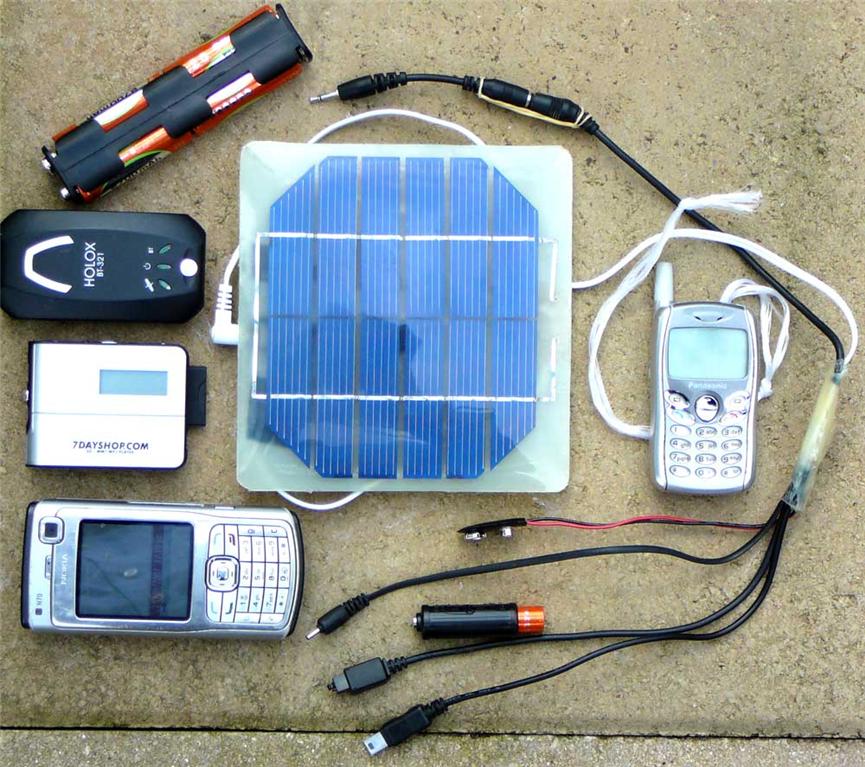
: my system is primary drive via A A rechargeable cells eight in total in series giving about 10 plus volts output. I require phone charging ability, plus charging my satellite navigation receiver and my MP3 player and utility torches. (For use while touring)
The existing B. and M. dynamo front light was halogen and rated at 3 W I wanted if possible to reuse that light, configured/adapted to use LED and also run off the battery bank directly via "fatboy. " I tried to use a bare emitter but had problems with the cooling and ruined one LED by sadly crippling it giving it a blue tint and much reduced output.
Plan B. entailed coring out the back of the reflector with a hole cutter of suitable size to take a five degree by 25 degree optic and holder, with the heat sink firmly attached to the star whittled down to fit the hollowed out rear end of the B&M lamp, everything put back together and you could not see that it had been modified apart from the optic pressed against the front of the original headlight acrylic.
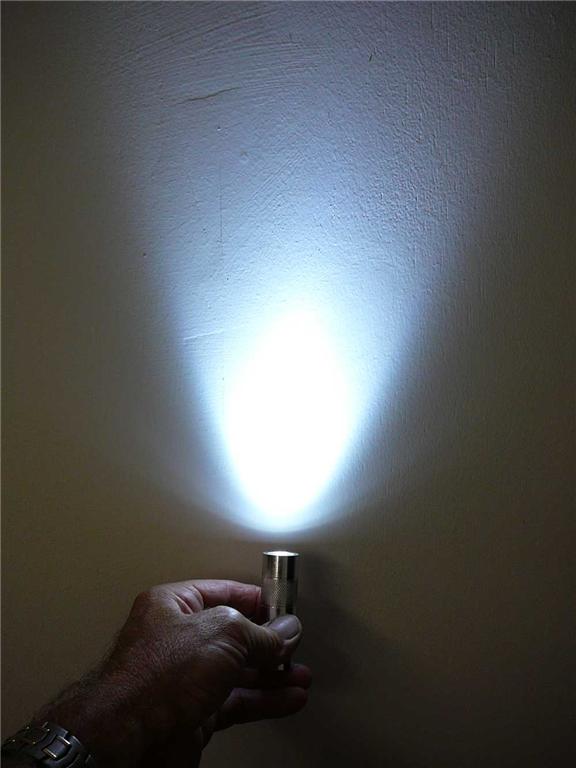
I was worried that the cooling may not have been sufficient as it was enclosed in plastic, I think it may be a problem if it were to be run at 1000 milliamps continually, but as 700 milliamps is indeed the sweet spot as I have proved by using the dimmer pot to adjust the light to the point of diminishing returns and measuring the current afterwards. I don't feel that heating is going to be a problem.
I planned on using three LEDs as my total loading, but my battery configuration giving 10 volts output meant that my boost converter would go into direct drive when I reduced the power output if I only used three! Even though it turned it down to 350 milliamps I required even further reduction to enable me to have an emergency lighting situation, for example if I chose to cycle through the night even though my 3 W Hub dynamo would be boosting the batteries one bank at a time switchable.
So I decided to bring four lights into the equation, with a small amount of testing this proved to be the answer to my battery configuration, using the trim pot I could then drop the output to about 70 milliamps which by the way was still brighter than the original lighting system.
The forward voltage from memory as I believe 2.7 volts minimum, so for approximation four times 2.7 equals 10.8 volts... 10.8 volts at 70 milliamps equals about threequarters of a Watt total for the four LEDs at a minimum power level, fully sustainable as the Hub dynamo is rated at 3 W.
I will win no prizes for originality as to the construction of my main lamp consisting of three LED stars in a very close triangular configuration screwed down to an old aluminium frying pan base and into the CPU heat sink on the rear, the frying pan was 50p at a car boot sale the heat sink was also 50p at the same car boot sale, screwing the stars down avoided using the very expensive thermal epoxy, I instead used normal heat sink paste. In my main lamp the lenses consist of 15 degree/25 degree/five by 25 degree elliptical: the B. and M. contains another five by 25 elliptical.
I rigged up a power supply temporarily, the lights were firmly fixed in their correct position on the bike and I tried them down a dark country lane tonight!!! Wow! I am amazed at the result and am very very pleased. With the lowest setting lighting is still adequate but at full beam I am a bit worried about dazzling the oncoming traffic! seriously. I see the need for a spot of about four or 5° instead of perhaps the 15 degree as a possible improvement but I feel I must be a bit picky to say that. I cannot compare them to the Cree LEDs as I have not used any yet, but I am totally sold on LED lighting for bicycles.
I bought the LEDs from Deal Extreme at approximately three pounds 50 each including postage so we will say £15 for the LEDs plus the optics, scrap box hardware mostly free.
If anybody is interested I will photograph my lights and put them online, I will claim originality for the modification to the B. and M. front light as I have not seen it done anywhere else, very effective and easy to do. With the added benefit of keeping the nice reflector surround.
I am very impressed with Task Led, the Fatman
boost converter is very efficient and tiny, when running about 700 milliamps through the LEDs the boost converter is consuming about 1.2 amps from the 10 plus volts supply, in other words consuming about 12 W ... the LEDs will be running approximately 3.6 volts each equals 14.4 volts times .7
equals 10.08 W which very roughly is 80% efficient but as that is a very rough calculation and the tiny board hardly heats up at all at that current I have a feeling the efficiency is much higher. Perhaps I will do some more checking on voltage readings and current readings.

Starting to explore & play

Yeovil


I obtained the necessary LEDs from America at a reasonable price, got the optics and heat sinks from Germany and started to play with them to find out what was obtainable. The following is a writeup to one of the forums explaining what I had in mind.

Hi I just registered this evening, but have been following your write-ups on using the seoul LEDs I had just discovered them myself prior to discovering your forum on the same subject. I am interested in organising myself some L. E. D. bike lamps, and to add more meat to the subject I also am an avid dynamo user, the reason being I like to go touring on my bike and the dynamo is my only consistent power source. Last year I did a month in France with a normal bottom bracket dynamo charging a pack of two AAcells, in retrospect this was not enough and my hastily constructed bridge rectifier was not sufficient for the power output and on one particularly good downhill run the rectifier popped, at least that's what I thought happened because it ceased to work even though the dynamo still put out power at the lights.
I have not constructed my lamps yet, but I do have the lenses for them, I am using a couple of six degree by 25 degree beams and one very narrow beam which needs a different holder than the rest, the P4 emitters are coming from the USA the pretty way via Hong Kong.
My proposed setup will be two banks of four AA cells in series giving approximately 10 volts input for a good stable output from an LM317T variable voltage regulator, I am hoping to regulate the current through the leds by simply running them in their operating parameters by forward voltage control; as the LM317T has over current protection in the region of one half amps and one p4 is capable of 1000 milliamps, with three LEDs in circuit they should be adequately protected from over current by the natural shutdown protection of the device itself so it probably could run at 1 amp all things being well which will mean approximately 350 milliamps each LED.
The power supply will also be used to charge my mobile phone/MP3 player/satellite navigation receiver without having to worry about supermarkets being shut on Sunday or having to buy batteries.
Charging the batteries by means of the Hub dynamo and bridge rectifier, with a double pole double throw centre off switch charge each bank of batteries separately, this can be done when most convenient during daylight hours taking advantage of downhill runs etc. and of course when using the lights. I am not quite sure how am going to configure the actual lights themselves, but I am rather interested in that http://ktronik.com/index.html hardware! looks really plush.
Also I am very interested in achieving maximum output from my Shimano Dyna hub.Anyone want to pick holes in my idea you are very welcome to do so, you may think of something I haven't or see a potential problem, anyway it is thanks to this forum that I have done this much already. Thanks chaps.


I had some very good feedback from the members, and some suggestions that my idea was not very good, I refer to that of using the voltage regulator as my prime limiting device.
After playing with that voltage regulator I found that it was not suitable really although I had not done any damage to any of the LEDs I decided not to continue in that direction.


http://www.cyclingplus.co.uk/forum/topic.asp?TOPIC_ID=124379&whichpage=2

Some very good writeups on that above link

My Requirements Re. Touring bicycle Electrical System

Yeovil


For the purposes of touring perhaps for extended periods of perhaps a month or so, I need an electrical system which is self powered ie. Powered by human power when required or downhill motion preferably!
Obviously I needed some kind of reliable quality prime power source or generator, this I obtained in the form of a Shimano dynamo hub, it came complete with front and rear lights and was purchased from eBay second-hand.
This electrical system has to provide me with, charging facilities for satellite navigation via my mobile phone Nokia N70, and the satellite receiver; also to provide me with charging facilities for MP3 gear and various small batteries for lighting etc.
In addition to charging up my power storage facility, I also need a well above average lighting system to enable me to cycle through the night when necessary or desirable; by well above average I mean that I need bright lighting not just a glowworm on the front of the bike, my investigations on the Internet of late has brought me to the conclusion that LED lighting is the way to go.
During my investigations of the real heavy bright lights available, I was firstly drawn toward Luxion LEDs K2's etc. but then was suddenly drawn toward a relatively new addition to the scene, the Seoul p 4 LED and especially "u bin" specification where the expected output in lumens is 100 lumens for input current of 350 milliamps! This is quite extraordinary and a lot of output power for input wattage.
I studied the forums as regards homebrewed lighting for bikes, and found them very useful because others had trod the ground before me, and I needed to know the common mistakes and useful tips.
In the following posts I will include some of my forum insertions.